Spider plants are beloved among houseplant owners for their ease of care and low maintenance needs – but even the hardiest specimens can be vexed by yellowing leaves. Don’t despair; if your Chlorophytum comosum is looking a bit worse for wear, some simple tips may get it back in fighting shape. Spider plant yellow leaves.
While spider plants are typically easy to take care of, yellow leaves can still appear. Thankfully, the answer could be as simple as changes in water or nutrient intake – or even a temperature shift! We’ll go over what causes your plant’s discoloration and how to make sure those vibrant greens return soon enough. So don’t worry; we’ve got you covered on this one.
Curing Yellow Leaves On Spider Plants
Is your beloved spider plant showing signs of distress? If its leaves have begun to turn yellow, it might indicate an underlying issue. But don’t worry – restoring the vitality of your indoor jungle can be as easy as following a few steps and getting back on track with care! A happy, healthy specimen should show off lush foliage in graceful curves, displaying vibrant green and white variegation. The texture should feel energetic but firm when touched; too soft or brittle may mean something is amiss. With some tender loving attention you’ll soon have that proud greenery flourishing again
- Check your plant’s light. Spider plants are sun-lovers, but too much can make them overheat! Bright, indirect light is best for these spunky little houseplants – enough to give them a kiss of sunshine in the morning or late afternoon. Too much direct sunlight will lead to their leaves fading and yellowing while inadequate lighting causes weakening and further discoloration. For your spider plant’s sake; find that perfect balance between love & light.
- Check your plant’s environment. Your happy spider plant needs just the right balance of semi-humidity and temperature to thrive – between 50-80°F. Too much heat or cold, like being near an air conditioner or heater, can spell disaster for your poor arachnid pal with yellowing leaves.
- Check your plant’s moisture levels. Your spider plant needs hydration, but don’t go overboard – use a light hand. Too little water will cause its leaves to parch and turn yellow; too much can lead to deteriorating roots from rot. Strike the perfect balance for lush green foliage.
- Check the soil for mineral buildup. To keep your plants looking and feeling their best, pay careful attention to fertilizing – it’s too much of a good thing if you overdo it. Flushing the soil periodically can help ensure fertilizer won’t accumulate in unhealthy concentrations; for added measure, repotting or watering with distilled water may be necessary as well.
- Check your plant for bugs. If your spider plant isn’t looking quite as lush and full as it once was, aphids and mites may be the culprit! These little pests can hide at the base of your spider plant and devour the leaves, turning them yellow or brown. Thankfully, there are natural methods to remove them. Working to make sure your spider plant has adequate airflow and using natural insect repellents such as neem oil can both help keep these pesky things away. With consistent care, you will soon be able to bring health and vibrancy back to your spider plant without any negative impact on nature.
- Prune away any dead or dry leaves. CPruning spider plants is an important part of keeping them healthy. When spider plants start to display dry leaves that are yellow or brown, it’s best to cut these away as soon as possible. Doing so can make room for new, healthy leaves to sprout instead, and should ideally be done a few leaves at a time in order to avoid shocking the spider plant. By cutting off those stow-away leaves and removing any excess we can help spider plants thrive.
- Repot your spider plant. Spider plants are a popular houseplant for many reasons–but mostly due to their easy maintenance and continual growth. Spider plants should always be kept in an appropriately sized pot as they inevitably outgrow it given enough time. If you notice your spider plant has grown larger than its container, try finding one that is just a bit bigger so your spider plant can grow unhindered. If the spider plant has become too big for its new container, don’t fret! You can divide the spider plant’s root ball so there is now a healthy spider plant in each separate pot. Dividing spider plants is an easy, cost-effective way to enjoy even more of these beautiful green and white leafy babies! Enjoy watching your spider plants grow into fullness with much love and care.
If your spider plant has taken on a yellowish hue, it may be time to give it some extra love and attention. With the right environment – proper light and water levels as well as an appropriately sized pot – its leaves will soon regain their natural luster! Show that special green friend of yours some TLC today.

1. Lighting Issues Causing Yellow Leaves On Spider Plants
Spider plants are no stranger to living in conditions other than their natural habitats. Possessing a remarkable adaptability, they’ve been popular houseplants since the 1700s and can survive an impressive array of environments – including indoors! However, due caution must be taken when placing these sun-shy beauties on window sills; too much exposure to direct sunlight will cause yellowing, wilting and burning leaves that curl inward as protection from further damage. If you have one near your south facing windowsill – move it away or add some sort of barrier between them if necessary for optimal plant health.
Your spider plant could be feeling a bit down if it’s been living in the shadows! To get your greenery looking lively and perky again, move it somewhere with more light from a nearby window. If you recently changed its environment though, don’t worry; like we all do when confronted with something unfamiliar, plants need some time to adjust – take good care of them during this period and their leaves will soon start greening up again.

2. Temperature And Humidity Problems Cause Yellow Leaves On Spider Plants
Does your spider plant feel hot and thirsty? It’s important to keep the temperature in its environment between 50-80°F so it can stay healthy. If you leave it outdoors, sudden changes in temperature could be harmful! Additionally, spiders like medium levels of humidity – if yours is feeling a bit parched try some simple methods from my article on increasing humidity indoors for houseplants.
Don’t let your houseplants suffer from a heatwave or cold front! Without realizing, they could be right in the line of fire when it comes to blasting air conditioners or space heaters. Make sure to keep an eye out for other culprits like desktop computers and ovens that also add some extra warmth– if you detect any suspicious activity near them then make sure to give those plants a better spot away from harm’s way.
3. You Have Overwatered Or Underwatered Your Plant
Spider plants are hardy, resilient friends that don’t need a lot of love to thrive. But if you’re tempted to give them an extra drink or two, it could have the opposite effect! To keep your spider plant happy and healthy – only water when their soil has dried out halfway down; after all, they can survive drought conditions a whole lot better than soggy ones. Give them too much TLC though? You might find yourself with some yellow-tinged leaves as evidence.
To keep your spider plant thriving, water wisely! Make sure the moisture levels are even and generous – if you can see some draining out of any drainage holes in the pot, that’s a good sign. Take into account how big your pot is relative to the size of your plant though; too much H2O will do more harm than good! Don’t forget about emptying drip trays as well for optimal root health.
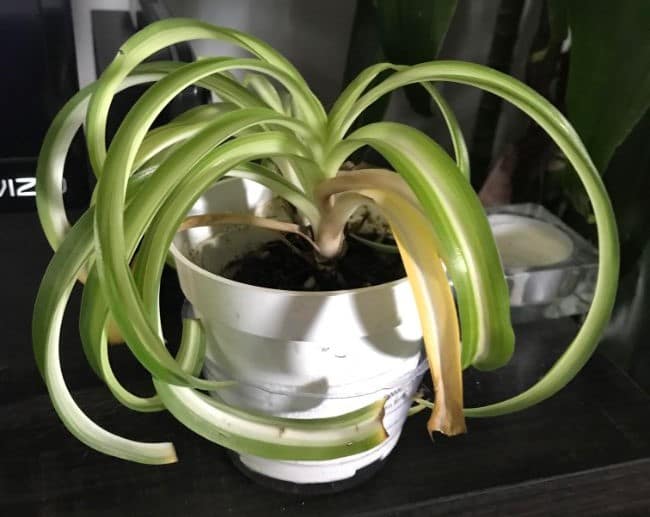
When spider plant leaves start turning yellow, drooping, or wilting, it can be a sign that the soil you’re using has too much moisture in it. If you notice that the soil is taking a long time to dry out, or if it is draining slowly, you should take action to reduce your risk of overly wet conditions. Moisture buildup can lead to root rot in spider plants; this disease takes advantage of the reduced oxygen supply around the roots caused by stagnant water and introduces fungi and bacteria which feed on the plant’s nutrients to survive. Preventing overwatering by either testing for moisture or considering different types of soil drainage can help keep your spider plant strong and healthy.
If you spot leaves on your spider plant turning yellow and drooping, it may be a sign that your spider plant is suffering from root rot. The solution to root rot is to repot your spider plant, into well draining and aerated potting mix while removing any affected roots. Consider switching to a larger pot with adequate drainage holes so the water can drain properly. Make sure that the new soil contains plenty of organic matter so the spider plant’s delicate roots have enough oxygen. Lastly, ensure that drainage is better than before; otherwise, the same issue may come up again. If your spider plant is affected by root rot, following these steps are essential in restoring its health.

4. Excess Fertilizer Causes Yellow Leaves On Spider Plants
Spider plants are beautiful indoor plants that thrive when given the appropriate care. When cared for correctly, spider plants can produce many vibrant leaves that can add a lovely touch to any living space. However, it is important to remember that spider plants are not heavy feeders and overfertilization can put strain on a spider plant’s health and cause its leaves to become yellow or brown/yellow at the tips. Overfertilizing can build up fertilizer salts in the soil, sometimes appearing as a white crust at the top of the soil – an especially serious sign of nutrient toxicity. To protect your beloved spider plant from nitrogen burn, apply fertilizer to it once per month during its growing season.
Spider plants are beautiful, low-maintenance houseplants, but their leaves may start to turn brown if their soil isn’t properly cared for. To keep spider plant leaves from turning, it’s important to leach the soil every few months. Leaching, which is simply rinsing the salt out of the potting soil in your spider plant by running water through it for a few minutes, is essential for keeping spider plant leaves healthy and looking vibrant. To do this safely, make sure you run water slowly and avoid harming your plant. While leaching should be done regularly, repotting your spider plant once or twice a year into a well-draining potting mix is also necessary to ensure good aeration and reduce the risk of overwatering.
5. The Type Of Water You Use Can Cause Your Spider Plant to Have Yellow Leaves
Spider plants are incredibly sensitive to the harsh contaminants found in tap water such as chlorine, fluoride and soluble salts. These substances can accumulate throughout your plant’s soil, reaching its roots and foliage; if this happens then you may end up with brown tips or yellowing leaves on your beloved spider plant! To help ensure that doesn’t happen it is recommended you check for a local water quality report from your area which will give insight into what minerals lie within the liquid running through our taps.
If your spider plant’s leaves are looking a bit dull, try switching up its water source! While distilled water offers the least amount of dissolved minerals and therefore isn’t always required, rainwater or filtered water can make all the difference in restoring vibrancy to your beloved foliage.
6. Your Plant Has Pests
Spider plants are beautiful, but be wary of their enemies lurking in the background! Aphids, mealybugs, whiteflies and even spider mites can wreak havoc on these beloved houseplants. Signs that they’re taking a bite out of your peace include yellow or brown spots left behind on leaves by attackers. Keep an eye out for any suspiciously discolored foliage – this could be your first warning sign to save them before it’s too late!
Spider plants are a favorite houseplant of many, but pests can leave them vulnerable to attack. The leaves clustered in the center create an ideal place for bugs to hide, making it important that you check regularly. If your spider plant is being plagued by unwanted visitors, try out these natural solutions on how to get rid of pesky houseplant bugs without damaging your beloved greenery.
Should I Cut the Yellow Leaves off My Spider Plant?
The Spider Plant is a vibrant and lively species, so make sure you’re helping it reach its full potential by removing the yellow leaves. It may seem difficult at first to tell which ones need pruning away, but with proper guidance from an expert or research on best practices, your plant will be well cared for! Doing this encourages new growth as old foliage won’t block any fresh sprouts of amped-up color. Give it some love – prune those plants.
Thus, grab a few supplies for the process, like pruners, disinfectants, and gloves.
Once you are done, follow the steps to remove the yellow leaves from the Spider Plant.
- Check for leaves that are yellow, brown, or unwell for their natural look.
- Take a pruner, spray disinfectant on its surface, and let it dry for a few minutes.
- Hold the leaf you want to remove at the base and snip it off.
- Remove the whole infected leaf away, or just cut around the brown tips to offer some shape to the plant.
- To remove the diseased baby spider plants, snip back where the baby’s stem joins the mother plant.
- After this, move the plant to an open place with good aeration and dappling sunlight.
How to Prevent Spider Plant Yellow Leaves?
Give your Spider Plant the TLC it needs and you can help keep those yellow leaves away! Providing water, sunlight, warmth, fertilizer and humidity are all essential to keeping this vibrant houseplant green and healthy.
- Amend a potting mix that holds moisture but is also equally well-draining. Ensure to maintain pH levels between 6 and 7.
- Always prepare the potting mix in a ratio of 1:1:4 by blending coco coir, perlite, and pine bark.
- Use balanced 20-20-20 NPK fertilizer once or twice a month in spring and summer.
- Prune the damaged leaves or baby Spider Plants instantly or normally prune once a year in early spring.
- Repot when the plant is root bound. Don’t stress the plant with frequent repotting.
- Consider using foliar application of Ferrous Sulfate solution for 4-6 weeks in the growing season to prevent the yellowing of leaves.

Select the transplants with a healthy set of leaves and start the transplants in smaller pots at first and then aim for a bigger pot later.
- Flush the soil once every eight weeks to prevent mineral buildup in the potting soil.
- Transplant your Spider Plant in spring. You can start the transplants in smaller pots and then move to larger pots later.
Conclusion
Spider Plants are renowned for their stunning leaves, making them beloved additions to the home due to their easy-care nature. To keep your plant looking its best, take note of some simple care instructions so you can ensure those luscious green leaves stay vibrant and healthy – even if they start yellowing with age.
Spider Plants are nature’s resilient warriors! After enduring even the most stressful circumstances, they come back fighting with lush green foliage. If you ever find your Spider Plant facing a problem in form of yellowing leaves, take heart – all it takes to bring them back is an awareness of causes and simple solutions.
Read more: Alocasia polly care :The guide

